In the previous article, I explained how to set an Index on a Table. In this article, I will explain, how to create field groups and how to use them in Microsoft Dynamics 365 F&O.
What are Field Groups?
Field groups are Objects which can exist on tables, maps, or views, and that can group fields logically together into a single Object. These field groups you can use to appear on the user interfaces like forms, gridviews, reports, etc. You should define a field group when several fields participate in a single function or are related in some way and are shown together on forms and reports.
Example for Field Groups?
In D365 F&O, the Customer Table contains many fields and field groups, The Credit field group contains fields that relate to credit like MandatoryCreditLimit and CreditRating.
How do field groups make it easier to create a logical layout in a form or reports in D365 FO?
- You can add the whole group of fields to a form or report in one step instead of moving them individually.
- The label given to the label groups can be displayed on the User Interfaces like forms or reports.
- You can use these field groups globally and can be accessed on any form or report.
- Any changes made in the field groups will reflect in all forms and reports that use it.
In D365 FO, when we create a table, map, or view, two field groups are automatically created which are AutoReport and AutoLookup. Where AutoReport is used to create the system’s automatic reports and AutoLookup is used in lookup forms.
How to create Field Groups?
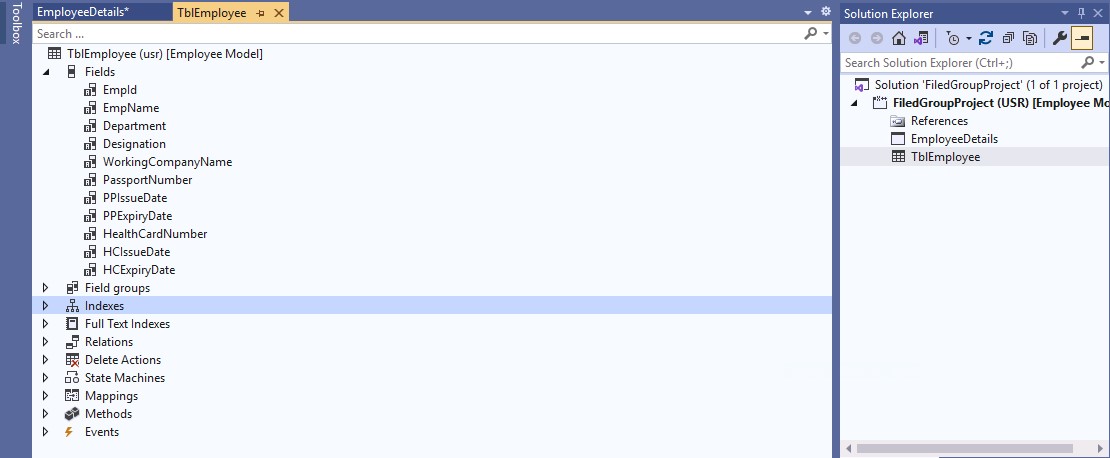
Suppose we have an Employee Master Table which stores Employee Basic Details and all the employee documents related details like passport, driving license, Health Card, etc. as shown in the below figure.
The first method is, you can directly assign the fields PassportNumber, PPIssueDate, and PPExpiryDate to the grid view of the form.
The second method is you can create a Filed Group, which holds only Employee Passport Related Details.
Here the second method of using a Filed Group is the recommended method.
So here you can follow the below steps.
If you are a beginner or a learner, you can use Microsoft’s learning platform for practicing D365 FO scenarios. There you can access both the technical and functional environments for practicing more.
1. Create a Table
If you are a beginner, you can visit the article “How to create a Table in D365”, Here we are creating a table with the Name “TblEmployee” as shown below.
2. Create a Field Group
For this,
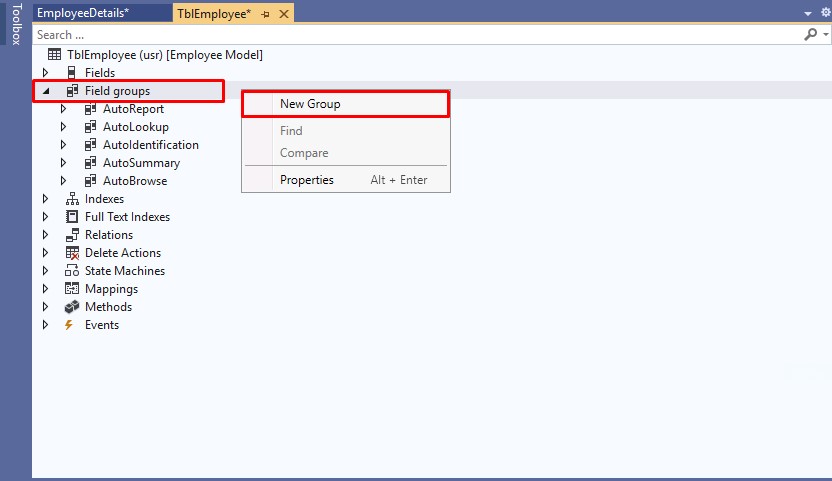
Right-click Field Groups, and then click New Group. This will add a new field group called by Default the name will be Group1. You can change the Field Group name according to your requirement.
In our project, I put the field group name as EmpPassportDetails. For this Right click the new field group, click Properties and then type a name for the field group in the Name property.
3. Drag and Drop the Required Fields
For this,
Right-click the table, click Open New Window, and then expand the Fields node, In the new window, drag fields from the Fields node onto your new field group. In our field group, we drag and drop the fields EmpId, EmpName, PassportNumber, PPIssueDate, and PPExpiryDate as shown in the below image.
Save then build the project to get the updated
version of the table EmpTable.
4. Create a Form
Right-click on the project name in the Solution Explorer, scroll to Add, and select New Item. In the Items menu to the left, select User Interface and then select Form. Rename the form to EmployeeDetails.
5. Set Data Source Property of the Form
For this,
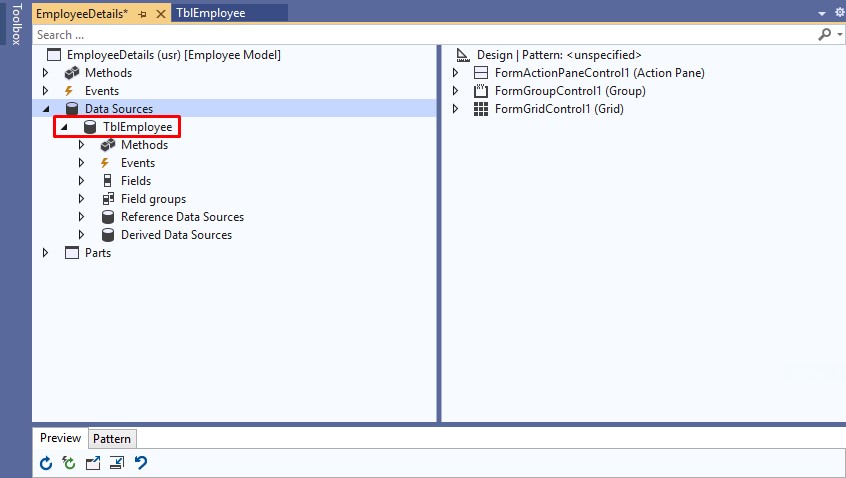
Drag and drop the table EmpTable from solution explore to the Data Source node of the form EmployeeDetails.
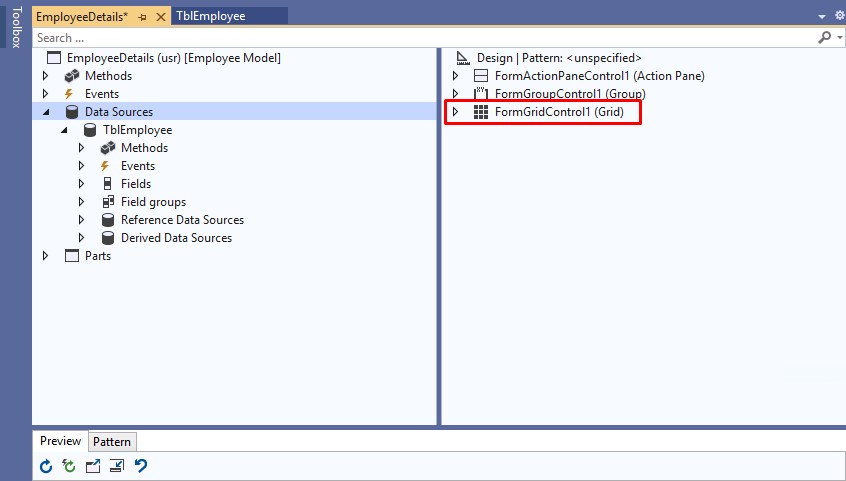
6. Add a Grid View to the form.
7. Drag and Drop Field Group to the Grid View
For this,
Open the field group node from the Data Source node of the Form EmployeeDetails. Then drag and drop the fieldGroup EmpPassportDetails as shown in the figure.
Then right-click on the Grid View and go to the properties window, assign table TblEmployee as the Data Source Property of the grid view, and assign field group EmpPassportDetails as the Data Group property of the grid view.
And change the label property of each field to the required labels to display on the column header of the grid view.
Now all the steps are completed. Now you can build and run the project,
Before running the project, you create a menu and assign the form to the menu. Finally, you will get the output as shown in the below figure.
Through the next articles, we will also learn how to set indexes and how to set field groups on a table, and how to create a relation to another table. If this post is useful for you, try to share this with your friends also. You can explore more tutorials from this blog. Happy coding with D365snippets.


No comments:
Post a Comment