What is a Label file in Dynamics 365 FO?
In D365 FO development you can directly input the labels, titles, or captions of any user interface, But in Standard project development, we need labels for displaying captions or titles in our user interface. The best practical method to achieve this goal is to use a label file. This label file contains a list of label IDs and related labels which are to be displayed on the user interfaces. You can call the label IDs to the user interfaces where you want to display the label. So, after creating a label file you must need to input a Label ID, a Label that is to be displayed on the user interfaces.
In this article, I will show you how to create a label file and how to use the created label file to display texts or titles on the user interfaces.
If you are a beginner or a learner, you can use Microsoft’s learning platform for practicing D365 FO scenarios. There you can access both the technical and functional environments for practicing more.
Creating a Label file
In this example, we are creating one Base Enum which stores the Quotation Statuses like “Quotation Created”, “Quotation Sent”, “Quotation Confirmed” and “Quotation Cancelled” against a customer inquiry. So, we are creating one Label file which used to store the statuses which are to be displayed on the elements of the Based Enum.
For this,
- Create a project LabelExampleProject.
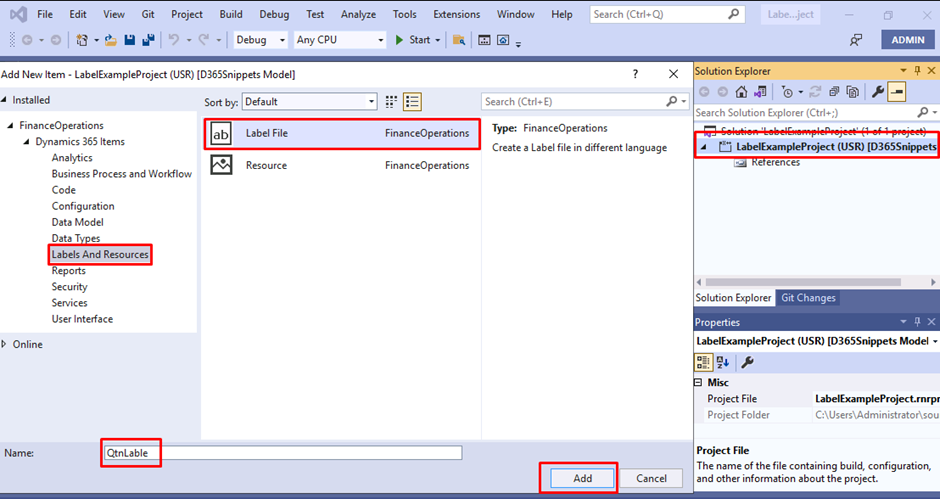
- Right-click on the project and select Add > New Items.
- From the FinanceOperations Artifacts > choose Labels and Resources.
- Then select the Label File from the list of items.
- In the Name field put a name for the Label File, Here I put QtnLable.
- Click Add button to open the Label File Wizard.
- Which opens Label File Wizard.
- Here you can see the already given label name and notes by Microsoft.
- which helps to avoid overwriting the label file during Microsoft's product upgrade.
- Click the Next button to select the language to create a new label file.
- Here you can select the languages for your label files.
- You can choose multiple languages to create label files.
- A language abbreviation will be added to the name of the created label files.
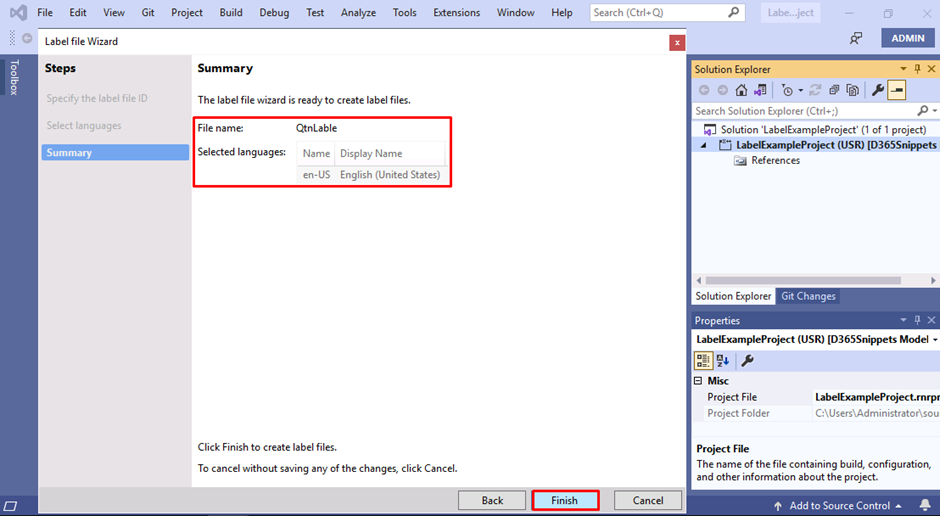
- Click the Next button, which gives the summary of the label file(s).
- the summary includes the Label File Name and Which languages you have chosen.
- in our case, we have chosen only the English(United States) language.
- Click Finish Button to finish the wizard.
for this,
- Double-click on the QtnLable Lable file in the solution explorer.
- Which opens a window to create the Lable IDs, Labels, and descriptions.
- Input the label value in the Search File.
- In my case, I put the first status “Quotation Created" in the search field.
- and Click on the New Button.
- Then you can see the label “Quotation Created" is created in the below grid view.
- repeat this step for the other three statuses.
- Finally, you can see the four quotation statuses created in the grid view.
In our project, I create this label file to display the quotation status in the quotation status table, I use a Base Enum to list the statuses on the table.
for this,
- Create a Base Enum and add four elements.
- In our example "Created", "Send", "Confirmed" and "Cancelled".
- Open the label file, and copy the first ID NewLablel1.
- Right-click on the first element of BaseEnum. Here element name is "Created".
- and go the properties of the Element.
- In the label property of the element paste the label Id which is already copied.
Next, create a table Quotation Status which lists the status of the quotations,
for this,
- Right-click on the project and select Add > New Items.
- From the FinanceOperations Artifacts,> choose Data Model.
- Select Table and in the name field put the name of the table, here QtnStatusTbl.
- Click the Add button.
Open the Table Designer window, drag and drop the Base Enum QtnStatusBE to the Fileds node of the table as shown in the figure.
Now the project Setup is over, the next step is to build the project, after successfully build the project, Running the project, then you can see the output of the project.
In the browser, you can see the labels which are added to the Lable file and assign these labels to the Base Enum and then to the Table.
This example covers the important three concepts like Table creation, Base Enum Creation, and Label File creation, All steps are given in a very understandable manner. If the article is useful to you, please don't forget to share it with your friends.
Happy coding with D365Snippets.


No comments:
Post a Comment