Building a calculator is a great project, especially if you have just started learning Dynamics 365 Finance and Operations Technical. It is quite simple for people of any skill level. This project covers the interactions between UI Design and Programming Functionality.
To get started, you need to consider the basic functionalities of a calculator. They include addition, subtraction, multiplication, division, delete, all-clear, and of course, the ability to use decimal numbers in performing these operations. But here we simply describe the basic four operations addition, subtraction, multiplication, and division.
In this article, I will explain only the UI Design process. In the next article, I will explain to you how to add Programming Functionality for functioning the basic functionalities of a calculator like addition, subtraction, multiplication, and division.If you are a beginner use Microsoft's free VM, where you can access both the Technical and Functional environments.
Let’s now build the User Interface for our calculator.
1. Create A Form
First, open Visual Studio and Create a new solution and project. Here I created one project with the name D365SnippetsCalculator.
After creating the project, Right click on the project name in the Solution Explorer, scroll to Add, and select New Item. In the Dynamics 365 Items menu to the left, select User Interface and then select Form. Rename the form to FrmCalculator and click Add.
2. Design The Form
After creating the form FrmCalculator, we need to apply the pattern to the form. Here we are adding a Dialog – Basic pattern to the form, for this,
Right-click on the Design | Pattern field, select Apply pattern and click on Dialog – Basic.
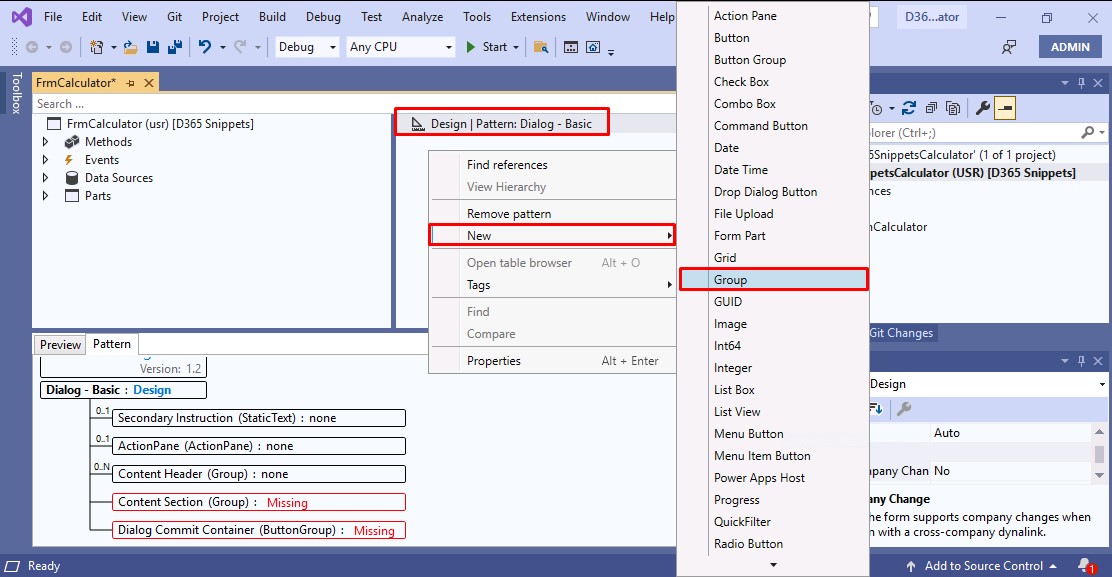
In the bottom Preview and Pattern areas, you can see the missing patterns, here the missing patterns are Group, for adding the missing patterns again Right click on Design | Pattern, select New, and click on Group as shown below.
Now the basic design steps are over,
3. Add Fields and Field Groups to the form.
In our calculator project, we are adding two integer text fields for inputting the values, and the result is displayed on another integer text field. So we need to group the two input integer text fields into one group and the result integer text field in another group.
Also, we need to perform basic operations like addition, subtraction, multiplication, and division. So we have to add these four buttons in another group. So totally we need to add four Fields and Field Groups to our form. for this,
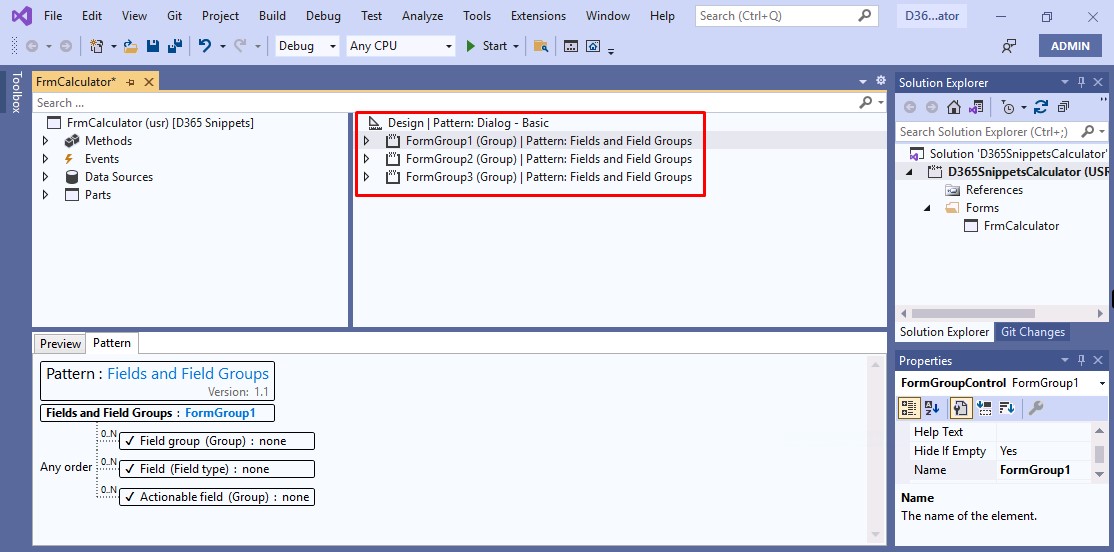
Right-click on the new Group, select Apply pattern, and click Fields and Field Groups as shown in the figure.
As we need 3 Fields and Field Groups, Right-click on the group and select Duplicate. Repeat this action until you have three groups. Rename 3 Fields and Field Groups into FormGroup1, FormGroup2, and FormGroup 3 respectively.
4. Add Text Fields to the Field Group
Rename the integer fields to Number1, Number 2, and Result respectively. You can also change the name of the integer to a more descriptive one (examples: Input1, Value1, Int1, Total, etc.). Repeat these actions on the remaining integers (consider renaming the third integer “Result”).
5. Change The Properties of Integer Fields
Change the value of integers Auto Declaration from “No” to “Yes” in the dropdown. for this, Right click on the first Integer and click on Properties. Repeat these actions on the remaining integers.
Also change the label property of Integer fields to Number 1, Number 2, and Result respectively, and label position to left.
6. Add Buttons To The FieldGroup
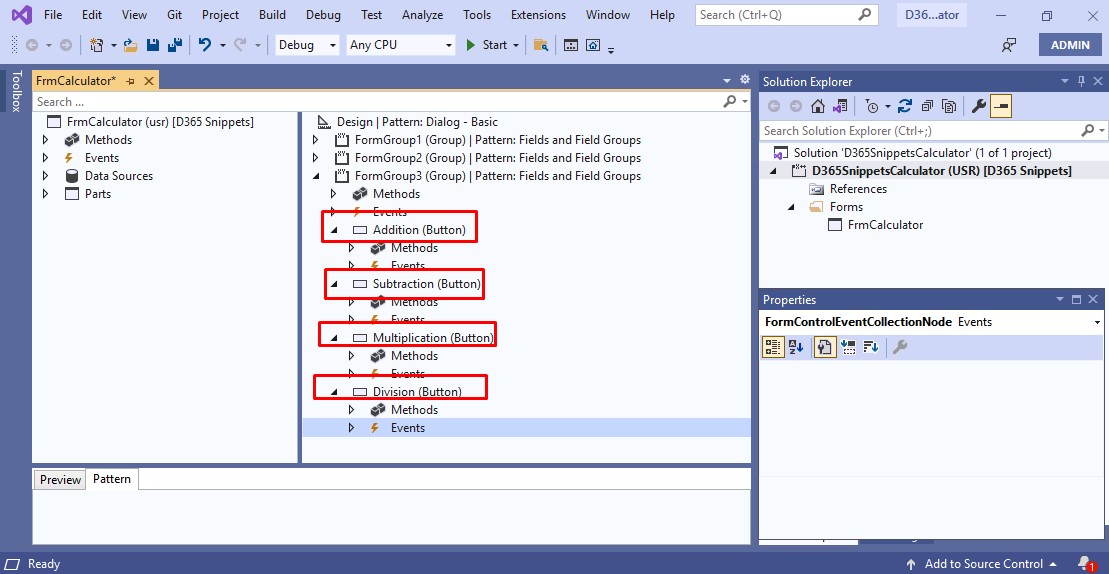
Here we have to add four buttons the FiledGroup3 for performing the basic operations like addition, subtraction, multiplication, and division. for this, Right click on Group3, select New and click on Button. Repeat this action once more in FiledGroup 3 for a total of two buttons.
7. Change The Text Property Of Buttons
In the Text field under Appearance, type in a plus sign (+). In the Name field under Data, type in “Add”.
In the Text field under Appearance, type in a dash (-). In the Name field under Data, type in “Subtract”.
For this, Right click on the first button in Group 3 and select properties. In the Text field under Appearance, type in an asterisk (*). In the Name field under Data, type in “Multiply”.
In the Text field under Appearance, type in a forward slash (/). In the Name field under Data, type in “Divide”.
Now the Calculator UI Design is completed. For running the project, set FrmCalculator as Set As StartUpObject. After building the project Your form should look like this.
Now Creating a Calculator in D365 F&O - Part 1 UI Design is over, In the next article I will explain how to add programming functionality to the four buttons. Happy Coding with D365Snippets.
Some useful tags
How to Create a Calculator in D365 F&O UI Design
Create a Calculator in D365 F&O: Programming


No comments:
Post a Comment